Vector offers a diverse range of battery chargers, including 15 and 40-amp models, suitable for 6V and 12V batteries. These chargers efficiently maintain gas or diesel batteries.
Vector also provides portable power solutions like the SS16LV lithium jump starter, boasting 1600 peak amps and USB charging capabilities for convenient on-the-go power.
What is a Vector Battery Charger?
Vector battery chargers are designed to efficiently and reliably charge and maintain a variety of battery types, including lead-acid and lithium-ion. They range from compact, portable units like the SS16LV jump starter, offering 1600 peak amps, to more robust models such as the BC15BV 15-amp charger.
Vector chargers often feature configurable settings and are built with a 5-year limited warranty, ensuring durability and peace of mind. They cater to diverse needs, from automotive applications to maintaining batteries in recreational vehicles and more.
Types of Vector Battery Chargers Available
Vector offers several charger types to meet diverse needs. The BC15BV is a popular 15-amp, 12-volt model, while higher-capacity options like the 40-amp BC40BV are also available. For emergency starts and portable power, the SS16LV lithium jump starter provides 1600 peak amps.
Vector also provides battery maintainers and chargers designed for specific battery chemistries. These units often include features like desulfation modes and multiple charging stages for optimal battery health and longevity, ensuring reliable performance.

Understanding Your Vector Charger Model
Identifying your Vector charger’s model number (like BM315V or BC15BV) is crucial for accessing specific instructions and utilizing its features effectively.
Refer to the unit’s label for this information, enabling you to find the correct manual and understand its capabilities.
Identifying Your Specific Model Number
Locating your Vector battery charger’s precise model number is the first step towards understanding its operation and accessing relevant support materials. This unique identifier, often found on a label affixed to the charger’s casing, is essential for downloading the correct user manual.
Common models include the BC15BV (15-amp, 12-volt) and BM315V, but variations exist. Carefully examine all sides of the charger for a sticker or imprinted text displaying the full model designation. Knowing this number unlocks access to detailed specifications, charging modes, and troubleshooting guidance specific to your device.
Key Features and Specifications
Vector battery chargers boast several key features, including configurable charging profiles for various battery types. Many models offer both charging and maintenance modes, ensuring optimal battery health. The BC15BV, for example, is a 15-amp, 12-volt charger, while others reach 40 or 50 amps.
Specifications often include a 5-year limited warranty and ship weights around 14 pounds. Portable models, like the SS16LV, deliver 1600 peak amps and feature USB ports for charging devices, alongside robust clamps and LED work lights.

Safety Precautions
Always disconnect the charger before making connections to the battery. Ensure adequate ventilation during charging and avoid contact with battery acid for safe operation.
General Safety Guidelines
Prior to using your Vector battery charger, carefully review all instructions and warnings. Always connect the charger to a properly grounded outlet. Never operate the charger in wet or damp environments to prevent electrical shock. Ensure the charger is placed on a stable, non-flammable surface during operation.
Avoid short-circuiting the terminals, and always disconnect the charger before connecting or disconnecting the battery. Do not attempt to charge non-rechargeable batteries. Inspect cables regularly for damage, and replace if necessary. Keep the charger out of reach of children.
Battery Safety Information
Batteries release explosive gases; ensure adequate ventilation during charging. Avoid creating sparks or open flames near the battery. Wear appropriate eye protection and gloves when working with batteries, as they contain corrosive materials.
Always disconnect the battery before charging to prevent accidental short circuits. Inspect batteries for cracks or leaks; do not charge damaged batteries. Properly dispose of old batteries according to local regulations. Lead-acid and lithium-ion batteries require different charging procedures – consult your charger’s manual.

Setting Up Your Vector Battery Charger
Connect the charger to a standard power outlet, ensuring proper voltage. Securely attach the charger clips to the battery terminals – red to positive (+), black to negative (-).
Connecting the Charger to a Power Source
Before connecting your Vector battery charger, verify that the power outlet is properly grounded and provides the correct voltage as specified on the charger’s label. Avoid using extension cords whenever possible; if necessary, ensure it’s a heavy-duty cord capable of handling the charger’s amperage.
Inspect the power cord for any damage – cracks, fraying, or exposed wires – and do not use the charger if damage is present. Fully insert the plug into the outlet, avoiding loose connections. A secure connection is crucial for safe and efficient charging.
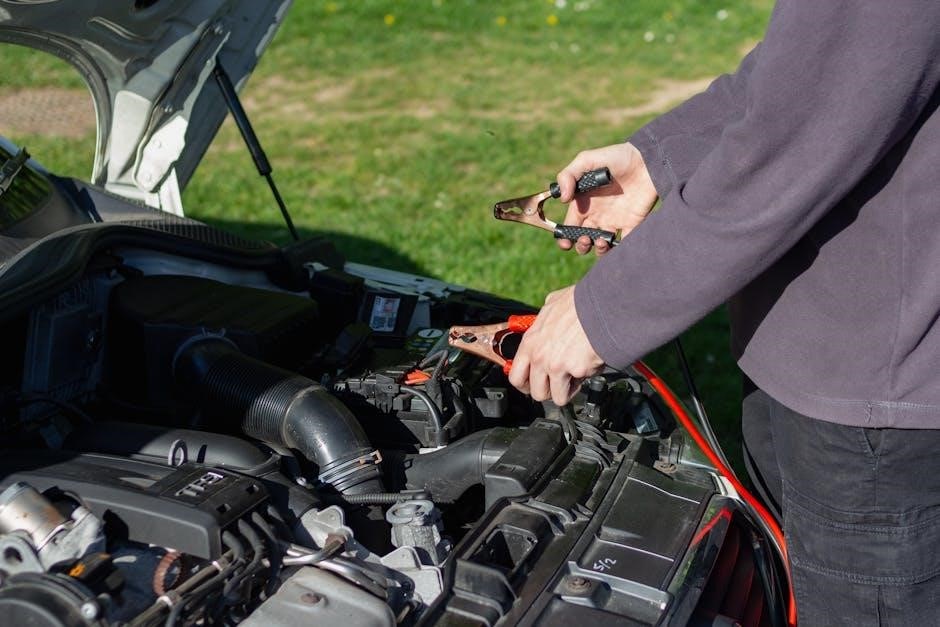
Connecting the Charger to the Battery
Ensure the battery is in a well-ventilated area before connecting the charger. Identify the positive (+) and negative (-) terminals on the battery. Connect the red clamp from the charger to the positive terminal and the black clamp to the negative terminal.
Double-check the polarity to avoid sparks or damage. Ensure a firm, clean connection; remove any corrosion from the terminals before clamping. Avoid touching the clamps together while connected to the battery or power source.

Charging Procedures
Select the appropriate charging mode based on your battery type – lead-acid or lithium-ion. Monitor the charging process, observing LED indicators for status updates.
Selecting the Correct Charging Mode
Vector battery chargers often feature multiple charging modes to accommodate different battery types and conditions. Carefully review your battery’s specifications to determine whether it requires a standard charge, a maintenance charge, or a desulfation cycle.
Incorrect mode selection can lead to reduced battery life or even damage. For lead-acid batteries, ensure the charger is set to the appropriate voltage (6V or 12V). Lithium-ion batteries require specific charging profiles; always verify compatibility before initiating the charge.
Monitoring the Charging Process
Regularly observe the charger’s LED indicators to track the charging progress. Vector chargers utilize lights to signal different stages – charging, maintaining, or completed. Pay attention to any error codes displayed, as these indicate potential issues requiring immediate attention.
Avoid interrupting the charging cycle prematurely, as this can negatively impact battery performance. Allow the charger to complete its programmed sequence for optimal results. Consistent monitoring ensures safe and effective battery maintenance.
Advanced Features & Modes
Vector chargers feature maintenance mode for long-term storage and desulfation mode to recover sulfated batteries, enhancing their lifespan and performance effectively.
Maintenance Mode Explained
Maintenance mode, a crucial feature of Vector battery chargers, is designed for long-term battery storage. Once the battery is fully charged, the charger automatically switches to this mode, providing a low, continuous charge.
This prevents the battery from self-discharging and becoming sulfated during periods of inactivity. It’s ideal for seasonal vehicles or equipment stored for extended durations. The charger monitors the battery voltage and delivers only the necessary current to maintain optimal charge levels, ensuring readiness when needed.
Desulfation Mode – When and How to Use
Desulfation mode on a Vector charger aims to recover batteries exhibiting sulfate buildup on the lead plates, a common cause of reduced capacity. Use this mode for lead-acid batteries that have been deeply discharged or stored for prolonged periods.
The charger applies a controlled high-voltage pulse to break down the sulfate crystals. This process can take several hours, or even days, depending on the battery’s condition. Monitor the charging process closely; desulfation isn’t always successful, and severely damaged batteries may not recover.

Troubleshooting Common Issues
If the charger won’t power on, check the power cord and outlet. For charging issues, ensure proper connections and select the correct charging mode.
Charger Not Turning On
If your Vector battery charger fails to power on, begin by verifying the AC power cord is securely connected to both the charger and a functioning wall outlet. Test the outlet with another device to confirm it’s providing power.
Inspect the power cord itself for any visible damage, such as cuts or frayed wires. If damage is present, do not use the charger and consider replacement. Also, check the charger’s internal fuse (if applicable) and replace it if blown.
Ensure the charger’s on/off switch is fully engaged. If the issue persists, contact Vector support for further assistance.
Battery Not Charging
If the battery isn’t charging, first confirm the charger’s clamps are securely and correctly connected to the battery terminals – red to positive (+), black to negative (-). Ensure the battery isn’t severely discharged or sulfated, as this can hinder charging.
Verify you’ve selected the appropriate charging mode and voltage setting for your battery type (lead-acid or lithium-ion). A faulty battery may also prevent charging; test the battery’s voltage with a multimeter.
If problems continue, consult Vector support for troubleshooting.

Technical Specifications
Vector chargers offer varying voltage and current outputs, with models like the BC15BV providing 15 amps at 12 volts. Charging times depend on battery size and condition.
Voltage and Current Output
Vector battery chargers are designed to deliver consistent and reliable power. The BC15BV model, for example, provides a 12-volt output with a maximum current of 15 amps, ideal for maintaining automotive batteries. Other models, like the 40-amp BC40BV, offer increased charging capacity for larger batteries or faster charging times.
These chargers automatically adjust the current based on the battery’s needs, preventing overcharging and ensuring optimal battery health. The output voltage remains stable throughout the charging cycle, contributing to a longer battery lifespan. Understanding these specifications is crucial for selecting the right charger for your specific battery type and capacity.
Charging Time Estimates
Vector battery charger charging times vary significantly based on battery size, discharge level, and the charger’s amperage. A fully discharged 12V automotive battery, using a 15-amp charger like the BC15BV, may take approximately 8-12 hours for a complete charge.
Utilizing a higher amperage charger, such as the 40-amp BC40BV, can reduce this time to 4-6 hours. These are estimates; deeply discharged or larger batteries will require longer charging durations. Regularly monitoring the charging process is recommended to avoid overcharging and maximize battery life.
Warranty Information
Vector battery chargers are backed by a 5-year limited warranty covering manufacturing defects. To initiate a claim, retain proof of purchase and contact Vector support.
Coverage Details
Vector’s limited warranty safeguards against defects in materials and workmanship under normal use for a period of five years from the original purchase date. This coverage encompasses failures occurring during intended operation, ensuring reliable performance. However, the warranty does not cover damage resulting from misuse, abuse, accidents, modifications, or unauthorized repairs.
Furthermore, normal wear and tear, including cosmetic damage, is excluded. The warranty is valid only for the original purchaser and requires proof of purchase. Vector reserves the right to repair or replace the defective product at its discretion.
How to Make a Warranty Claim
To initiate a warranty claim, contact Vector support with your original proof of purchase – a receipt or invoice – and a detailed description of the defect. You’ll need to provide the model number and date of purchase. Vector may request photos or videos documenting the issue for assessment.
Once approved, Vector will provide instructions for returning the product, or may authorize a local repair. Shipping costs for warranty returns are the responsibility of the customer, unless otherwise specified by Vector.
Maintenance and Care
Vector chargers require minimal upkeep. Regularly clean the exterior with a dry cloth. Store in a cool, dry place, avoiding extreme temperatures and humidity for longevity.
Cleaning Your Vector Charger
To ensure optimal performance and longevity of your Vector battery charger, regular cleaning is recommended. Always disconnect the charger from both the power source and the battery before commencing any cleaning procedures. Use a soft, dry cloth to wipe down the exterior casing, removing any dust, dirt, or debris that may have accumulated.
Avoid using water, solvents, or abrasive cleaners, as these can damage the charger’s components. For stubborn dirt, a slightly damp cloth may be used, but ensure the charger is completely dry before reconnecting it. Inspect the charging cables and clamps for any signs of damage and replace them if necessary.
Storage Recommendations
Proper storage is crucial for maintaining the lifespan of your Vector battery charger. When not in use, disconnect the charger from the power source. Store it in a cool, dry, and well-ventilated location, away from direct sunlight, extreme temperatures, and moisture.
Avoid storing the charger in areas with high humidity or dust levels. It’s best to keep it in its original packaging or a protective case to prevent damage. Regularly check the cables and clamps during storage for any signs of deterioration and ensure they are securely stored with the charger.

Vector Charger for Specific Battery Types
Vector chargers are designed for both lead-acid and lithium-ion batteries. Select the appropriate charging mode based on your battery type for optimal performance and longevity.
Charging Lead-Acid Batteries
When charging lead-acid batteries with your Vector charger, ensure the charger is set to the correct lead-acid mode. This optimizes the charging process for flooded, AGM, or gel cell types. Begin by connecting the charger to the battery, observing proper polarity – red to positive, black to negative.
Monitor the charging process, as Vector chargers often feature LED indicators displaying charging status. Avoid overcharging, which can damage the battery. Utilize the maintenance mode for long-term storage, keeping the battery topped off and extending its lifespan. Always consult your battery’s specifications for optimal charging voltage.
Charging Lithium-Ion Batteries
When charging lithium-ion batteries with your Vector charger, select the dedicated lithium-ion charging mode. These batteries require a specific charging profile differing from lead-acid. Ensure proper polarity when connecting the charger – red to positive, black to negative.
Vector chargers designed for lithium-ion batteries often include features like temperature compensation for optimal charging. Avoid charging below freezing temperatures. Monitor the charging process via LED indicators. Never overcharge lithium-ion batteries, as this can cause damage or pose a safety risk.

Understanding LED Indicators
Vector chargers utilize LED indicators to display charging status and potential errors. Decoding these light signals is crucial for monitoring the process and identifying issues quickly.
Decoding the Light Signals
Vector battery chargers employ a system of LED indicators to communicate the charging process effectively. A solid green light typically signifies a fully charged battery, ready for use or maintenance mode. A flashing green light often indicates the charging cycle is in progress, actively replenishing the battery’s power.
Conversely, a solid red light usually signals a problem, such as a reversed polarity connection or a faulty battery. A flashing red light may indicate a specific error code, requiring further investigation. Refer to your charger’s manual for a comprehensive list of error code meanings to diagnose and resolve any issues promptly.
Error Code Meanings
Vector battery chargers utilize error codes displayed via LED indicators to pinpoint issues. While specific codes vary by model, a common error signifies reversed polarity – immediately disconnect and correct the connections. Another code may indicate a sulfated battery, suggesting desulfation mode is needed.
A low voltage error signals an insufficient power supply or a severely discharged battery. Consult your charger’s manual for a complete decoding of all LED flash patterns and corresponding error messages. Addressing these codes promptly ensures optimal charging and battery health.
Frequently Asked Questions (FAQ)
Common queries involve battery compatibility and troubleshooting charging issues. For detailed support, Vector provides contact information for assistance with your specific charger model.
Common User Queries
Users frequently ask about compatibility with different battery types, specifically lead-acid and lithium-ion. Many inquire about the meaning of the LED indicator lights and error codes displayed during operation. A common concern is why the charger isn’t turning on, often related to power source issues.
Another frequent question revolves around batteries not charging, prompting inquiries about correct mode selection and potential battery sulfation. Some users seek clarification on maintenance mode and desulfation features, wanting to understand optimal usage for battery longevity.
Contacting Vector Support
For dedicated assistance with your Vector battery charger, reaching out to their support team is crucial. While specific contact details aren’t readily available in the provided snippets, users experiencing issues should explore the official Vector website for support options.
Typically, manufacturers offer phone support, email correspondence, or online chat features. Referencing your specific model number when contacting support will expedite the troubleshooting process. A 5-year limited warranty is offered, so have purchase details ready for potential claims.